Monday, July 29, 2013

Back to School Gifts

I love the excitement of Back to School time.  I love to shop.  I love to make things.  And I love to give gifts.  Roll all of that into one and what do you get?  Back to School gifts for my co-teachers!  I made them a cute pencil cup out of a tin can (from a can green beans, corn, or whatever other veggie you eat for dinner), some hot-glued crayons and ribbon, and a gerber daisy.  Super cheap, super easy, and super cute!  Add a few bright neon pencils tied with a string, plus a cute graphic someone else made, and you've got instant gifts!  So easy!


The graphic says "#2 pencils for a #1 teacher" (in case you can't read it).  I hope my co-teachers like them!
 
 
I'm also linking this post up with Tara today!  Click the button below to check out what everyone else has been up to!  Thanks, Tara!


Sunday, July 28, 2013

Truffula Trees!

I love all things Dr. Seuss.  I ran across a tutorial on how to make Truffula trees (from The Lorax) sometime last year.  I pinned it but never got around to making one.  I usually don't have the time and/or energy to craft during the school year, so projects get done in the summer.  Well, with less than two weeks left before I go back to school, I decided to give 'em a go.  I love how they turned out!  Ta-da!

They were pretty simple to make, too!  I got the yellow planters at Walmart for $2.97 each.  I added polka dots using acrylic craft paints and a round foam brush. 

The sticks are actually tree limbs from my (neighbor's) yard!  We have pecan trees and are constantly having limbs blown down in storms.  To get them to stay standing up in the planters, first I put a thick layer of dirt from my yard (helps absorb the water from the p of p-->), then I used plaster of paris (found at Lowes for $5.98), mixed according to the directions on the box.  I used 4 cups of plaster for each one.  It said that it needs to set for 24 hours, but it was stable enough for me to start painting them in about 2 hours.  Again, I just used acrylic craft paints and a foam brush.  They needed about 3 coats of each color to be completely covered.

For the top fluffy parts, I used an 8'' Styrofoam ball (ridiculously expensive @ $12.94 a piece!!) and a feather boa ($4.98 each).  I found both at Walmart.  I just started wrapping the boa around the ball and pinning it every so often with straight pins.  I did have to adjust and readjust to get it to cover well.  (Don't try to use hot glue or you will get a gunked up, grody feathered mess). 

Then I just shoved the bottom of the balls down on the top of the tree limb!  Nothing to it!  I added pom poms (also from Wally World: I think they were $3.97 for 100, various sizes) at random places on the sticks just because I felt like it.  Then I got a chevron plastic tablecloth (97 cents from Walmart) to add to the planters to finish them off.  The tablecloth was just chevron on the sides with a white middle, so I just cut it and used one side for each planter.  You could use fabric, rocks, or whatever else you like.

And that's all she wrote!  Super easy and super cute!  I love 'em!  I know my kiddos are gonna get a kick out of them this year!

_______________________________________________________________________
Monday, July 29: I've linked up with Tara for Monday Made It!  Click the graphic below to see all the other great projects out there!  Thanks, Tara!

Thursday, July 25, 2013

And almost a year later....I'm still alive

Oh my gosh, y'all, it has been almost exactly a year to the day (5 days short!) since I last blogged!  Wow!  I started my blog in June last year, and posted all of the crafts I was creating for my (then new-to-me) 4th grade classroom.  But once I got done with my crafts, I really didn't know what else to say!  Haha!  And then school started, and you all know what that means!  Total craziness!

I fully intended to post pictures of my classroom after I got it ready last August, but then things got so busy that I never got around to it.  And I fully intended to blog about my first year in 4th grade, but as you can see, that never happened either!  I've looked at my blog a few times over the last year, and I almost even decided to delete it, because I just didn't have the energy to add anything to it.  But then I thought about the pics of things I've made that are on Pinterest, and how they would be deleted if I did that, so I decided not to.  But I still didn't have the energy to do more to it.  So here it has been sitting for nearly a year.

So....how've ya been? ;)  I guess I may end up just being a "summer blogger". Haha.  Who knows.  Maybe now that I've gotten a year of 4th under my belt, I'll have more time and energy to focus on blogging?  I guess we'll see.

But I'm back today to show you another craft!  (What else?)  Today I made a school supply cake that I saw on Pinterest.  I followed the tutorial at The Butlers blog.  I love how it turned out!  It is so cute!  Seeeeee???
 
 
I just love it!  I am going to be making something else fun for my room tomorrow!  Stay tuned!

Friday, July 6, 2012

New Freebie added

I just created a new freebie based on this pin on Pinterest.  Go to my Freebies page to check it out!  Here's what it looks like:

Leave me some comment love to let me know you were here! :)

Tuesday, July 3, 2012

Update to the "I'm Outta Here" board


If you've read the update to my "I'm Outta Here" board that I made yesterday (you can read the original post and the update added here), you know that I messed up that board with Gorilla Glue.  Here's a sample of the mess:
It was everywhere.  I was so mad.  I let it sit there for several days before I decided to do anything about it, because I knew it would not be an easy fix.  Today, I finally decided to tackle it.  After trying to cut away most of the seeped out glue with scissors and a knife, I was left with chipped paint and remnants of glue.  I didn't know what to do.  I decided to try to make borders around the frames that got messed up with ribbon, but wouldn't work well and would require a lot more gluing.  So I went with duct tape.  I had searched and searched for polka dot duct tape everywhere locally and couldn't find any.  I was frustrated by that because there are some projects I wanted to use it on.  But Saturday I scored at a Walmart about 30 minutes away.  I bought 4 rolls.  Then my husband told me today that he saw some at our local Walmart today. *sigh*  Of course.  It would happen that way.  Anyway....

After a while of dealing with it, this is what I came up with.  I added some polka dots to it, too, because I thought it was just too plain before.  So here's the finished product (minus the arrow to be added once I get it to school) :


So, what do you think of it now?

Monday, July 2, 2012

I just figured out permalinks!

It took a while, and several Google searches, but I finally got a good explanation of how to make permalinks more prominent.  Right now, if you have clicked on one of my current pins from Pinterest, they take you just to my Home page and you have to scroll down to find what you are looking for.  Sorry about that!  (I'm learning as I go!)  BUT, now that I have figured out permalinks, I have tried to make things a bit easier for you.  If you will go to either "Classroom Crafts", "Freebies", or "Tutorials" in my links up at the top, you can find what you are looking for much more easily.  From now on I know how to pin things so that it will take you only to that one post instead of the Home page.  No more scrolling forever!  You're welcome! :)

QR codes: My 1st Monday Made It Link Up!

This is my first link up to another blog and I am so excited!  This blogging thing is so much fun!  I made the following last night, and then was looking at some other posts on Facebook and the 4th Grade Frolics website, so I thought I would add this in!  I hope you like it and hope you come back and visit often!  You can become a follower down at the bottom of my page! :)  Thanks for stopping by!


I just got through creating a QR code for Open House.  I will hang it outside my door and parents can scan it with their smart phones.  It will link them directly to my school webpage.  This is the coolest thing ever! (Well, until the next coolest thing I find! haha)  I'm so excited.  Here's what it looks like:

So cool! 
Now, to make your own, follow these steps:
  • Go to http://www.qrstuff.com/
  • Open your school webpage in another browser window
  • Right-click on the address in the address bar and click copy
  • Back on the qrstuff site, there are 4 steps, but they are super easy!
  • 1) is already done for you (Data Type: Website URL is already selected.).
  • 2) Content: right-click in the box and click paste. There are two buttons below that--you don't need to do anything there.  Move on. :)
  • 3) You don't need to do anything here, either, unless you want to change the color.  I wouldn't.  Move on.
  • 4) Here's where you choose what to do with your code once it's created.  If you choose print, it only gives you options for multiple images, so I wouldn't choose print.  I chose download.  then you can save it to your computer, and then create a page like I did above.
Simple, easy, and fun!  And your new parents and students will think you are so hip!

If you need any help with it, please feel free to email me!  I LOVE TECHNOLOGY!!

Update 7/21/12: I'm also linked up with Jen at Teaching and Tech!  Click the button below to see more technology link ups!  Thanks, Jen!

Saturday, June 30, 2012

Email me

Once I figure out how to create an "email me" button, I am going to add that to my site, but until then, here's my email if you have questions or want to show me products you've made from my ideas.  I'd love to see them!
mrsbrowndotcom@gmail.com

Friday, June 29, 2012

Freebie!

I just got through making a freebie in honor of my first comments and followers.  I saw it on Confessions of a Teaching Junkie's Facebook page.  Of course, I had to put it on polka dot paper!  Here's what mine looks like:


Here's the link to where you can get it: Jenny Brown on TpT. Enjoy!

My first comments and followers!

I'm so excited!  I just got my first comments today!  5 sweet ladies in one day!  And 2 of them said they were "followers", too.  I HAVE FOLLOWERS!!!  Woohoo!  This is just too much fun!  Thank you, ladies!  You made my day!

Thursday, June 28, 2012

Dropbox!

How many of you know about this already and didn't tell me???  I just found the coolest thing since sliced bread flash drives!  It's called Dropbox.  You install it on all the computers you use, and you can drop files into it on one computer, and it's automatically on the other computers!  It'll even work on your smart phone!  I may be late to the party, but I am so excited that I just found this!  It'll make working between home and school so much easier!  No more emailing files to your home email.  No more scrambling around to find that misplaced flash drive (those things are so darn small, I always lose mine!).  It is just too cool!  Go check it out!  It's awesome, I tell ya!

Tuesday, June 26, 2012

More crafting!

I've been working on more crafts for school, and a couple for home, too.  I'm having so much fun. For the first one I'm showing you, I was inspired by a pin similar to this on Pinterest.  I saw it on a Classroom Management board, and the pinner said she envisioned a board like this for her classroom for papers that have no name on them.  I thought, "Genius! I am SO doing that!", so I did it.  And it came out soooo cute!  See??

Is this not adorable??  What a great idea!  I had TONS of papers without names while teaching 1st grade, but I'm hoping I'll have less of that in 4th.  But I have such a cute board to use in case there are any. :)  Now I won't have to say over and over, "Who's paper is this?" "This paper doesn't have a name on it", "so-and-so, I don't have your paper; is one of these yours?"  I'll just stick the paper on this board and tell the students they need to check the board for their papers.  Of course, I will start this procedure at the beginning of the school year.  I'm so excited!  I love this idea!

How I made it: I had the board ($4.99 from, where else? Hobby Lobby) in a closet for a long time, not knowing what to do with it.  It was just plain white, and I intended on using it somehow in my home decor.  But I never could think of a good idea for it.  Until now! 

I found the adorable letters in the spray paint/wallpaper section of Walmart for 97 cents a sheet!!!  Can't beat that deal.  They are stick-on.  Then I added a strip of left over wrapping paper that I've been using on my Mod Podge projects to it, painted some clothes pins, and hot-glued them on. Super easy and ADORABLE!!!! 

The second thing I got finished today is a board for students to "sign out" when they leave the room.  I was inspired by this pin , and took it a little bit further.  I am not sure if I am really done with it or not--I may end up adding some polka dots to it or something.  I have a cute arrow that I am going to add to it after I get it in the classroom and see where I am going to put it.  Which direction the arrow goes will be determinded by where I put it in my room.  (I want the arrow to point to the door.)  Anyway, here it is:

 It is BIG.  I am hoping there will be a good place near the door for it. (Remember, I am moving to a new room, so I am not very familiar with the layout yet.)  The arrow is going to go right under the words.  I am not sure if it needs polka dots or not. What do you think?  I love it, though.  This way I will know where every student is all the time (I have a bad memory!).  Then, in case of an emergency drill or whatever, I can glance at it and make sure I know where everybody is and who they should be with.  The yellow board is a heavy piece of plywood, approx. 4x3 ft.  It was left over from a project my hubby was working on.  Already framed out on the sides and everything.  So I confiscated it  asked him if I could have it.  ;)  I painted it yellow, which took several coats.  I had the three frames in the middle (I didn't do anything to them--they looked this way when I bought them) in a closet forever, not knowing what to do with them.  But they were so cute, so I had to buy them.  And let them sit in a closet. Cuz that's how I roll.

I also had the outer two frames in a closet, but one was black and one was gold, so I painted them and added the bows.  I used a white paint pen to write the words on them.  The pink one is our "pull out" teachers' names.  I wracked my brain for a couple of weeks to make sure I wasn't forgetting a major "out of the room" place, and I could only come up with these.  I hope I didn't forget anything major!

I broke the stands off the back of the frames and hot glued them to the board.  I staggered them 1) because I liked it better that way, 2) (the main reason) because I can't do anything in a straight line, lol, and 3) because the frames were not all the same size.  The 3 in the middle are 4x6's and the two on the ends are 5x7's.  But with them staggered, you can't really tell. :-)

For the background of each frame, I simply cut out a plain white piece of paper to the right size and put them inside.  The students will use a dry-erase marker to write their names on the appropriate "boards" when they are ready to leave the room.  Another fabulous piece of organization!  I love it!

**Update (7/2/12) on the "I'm Outta Here!" board: the hot glue did not hold! So hubby gave me some Liquid Nails type stuff to try.  It didn't hold, either!  I was getting frustrated, so I pulled out my Gorilla Glue that I've used before.  I hesitated to use it because it has always spread and squeezed out past where I put it when dried, and I was left with a clumpy mess.  But I tried it anyway.  And it held! :)  But it also squeezed out! :(  So now I have clumpy gunk to try to figure out how to get rid of.  Ugh.

And just for the fun of it, I'll add in the two home crafting projects I've done:

 (I know the color quality of this pic is terrible, sorry.)  When I first made it last summer, this is what I came up with.  I wasn't too thrilled with it, plus it didn't really go well anywhere in my house.  So, it too, went in a closet.  I brought it out this week when I was doing my other crafts and ....


added these flowers!  It made such a big difference!  I really like it now.  The colors match my bathroom, so I hung it up in there.  And although nothing else in there is zebra--it's all French country--I love it in there!


One other thing I've been working on is this:


The R is my hubby's initial and the J is mine.  They are thin wood letters (the & sign is a lot thicker than the letters) that I found at Hobby Lobby.  I had the canvas from another project and I painted over it with some leftover paint.  Gorgeous color--Valspar Deep Blue Sea.  Then painted the letters brown.  The colors match my bedroom colors.  Not sure where I am going to put it, but I'll find a spot!  I am not quite done with it yet, though.  I am going to find smaller wood numbers for the year we got married, paint them, too, and add them to the bottom left corner.  I love it!

I've been having so much fun crafting this summer.  It feels so good to be productive instead of just sludging it around all summer.  I can work a little when I want to, and relax when I want to.  It's perfect!  I've got many more ideas running around in my head, so who knows what I'll come up with next!

Wednesday, June 20, 2012

It's official!

I got an email today that let me know I could finally announce something I've been so excited about but had to keep under wraps for a while.  I am going to be teaching 4th grade next year!  I have taught 1st grade for 6.5 years, and I am really in need of a change.  I am going to miss the other two 1st grade teachers that I have worked with!  Ms. K and Ms. R are great teachers!  I will be way on the other end of the school from them now, so I probably won't get to see them much. :(

But on to the good stuff!  I have been frustrated for quite a while teaching 1st grade.  I even was at the point of almost quitting teaching altogether.  But the Lord stopped me from doing that and opened this door instead.  I am hoping that it is just the change I need!  He knows what is best, and with everything working out so smoothly like it has, it has made me excited about teaching again!  With 4th graders I will be able to do so much more than I could have with 1st graders.  And more importantly, THEY will be able to do so much more for THEMSELVES than 1st graders can!  That's the part I am most excited about.  I can't wait to see how much more they can do. 

Our school will be departmentalizing in grades 4-6 next year, so that means I won't be teaching all the subjects, either, which is something I am also looking forward to.  Ms. L will be teaching Math, Mrs. R will be teaching Reading, and I will teach Science, AL History, and English.  It will be very interesting to see how it is all going to work!  But I am excited and looking forward to it.  And I really can't wait to get into my new room and start getting it set up!  But alas, we can't get in till at least the end of July.  And I don't want to rush my summer away!  So I will just enjoy my time off and my crafting to get everything polka dotty. :)

Mod Podge sucks! (a.k.a. Bookcase Upcycle)

I learned 3 things today:
1. Working with Mod Podge sucks!
2. Those crafty bloggers out there that make it look so easy to work with and have no wrinkles in their projects are LIARS!!
3. Plain bookcases might not be so bad.
*sigh*

I just spent 2+ hours on another Mod Podge project. It was a bugger!  That saying "Practice makes perfect" does not apply here.  It is full of wrinkles and bare spots, but I do have to say it is very cute!  And of course, it matches the brown cart that I did a few weeks ago. 

Presenting the old-tan-Walmart-put-together-with-a-million-pieces-bookcase (yes, I forgot to take a 'before' shot!) UPCYCLE! :


Bravo! Bravo! (yes, I am cheering for myself because this was such a BUGGER!!)

It may, in fact, be my last Mod Podge project.  At least for quite a while.  I'm hatin' the stuff right now.


I also completed two more projects this week.  Here is a shot of a brown desktop officey type box (I don't know what it's called!) that I painted:

Now, yes, I realize that the 'after' shot is in front of the 'before' shot, and it should be the other way around, but work with me here.  I'm new to all this.

Here's the lampshade I re-did:


Yes, you can see that I had already started painting it when I remembered to take a 'before' shot!  But at least I remembered.  And I got the 'before' shot first this time.  Now, we are not going to mention the fact that it didn't occur to me to put the shade on the lamp and turn the lamp on to see if I had enough white coverage so that the pink gingham wouldn't show through before I did the polka dots and flowers....yeah, we're not going to think about that.  It looks cute even if I don't actually USE the lamp, right??

(I realize that the second to last sentence in that paragraph is really long and probably a run-on sentence [bad teacher!], but it's late and I'm tired, so just deal with it.)

We'll see ya next time! 

Monday, June 18, 2012

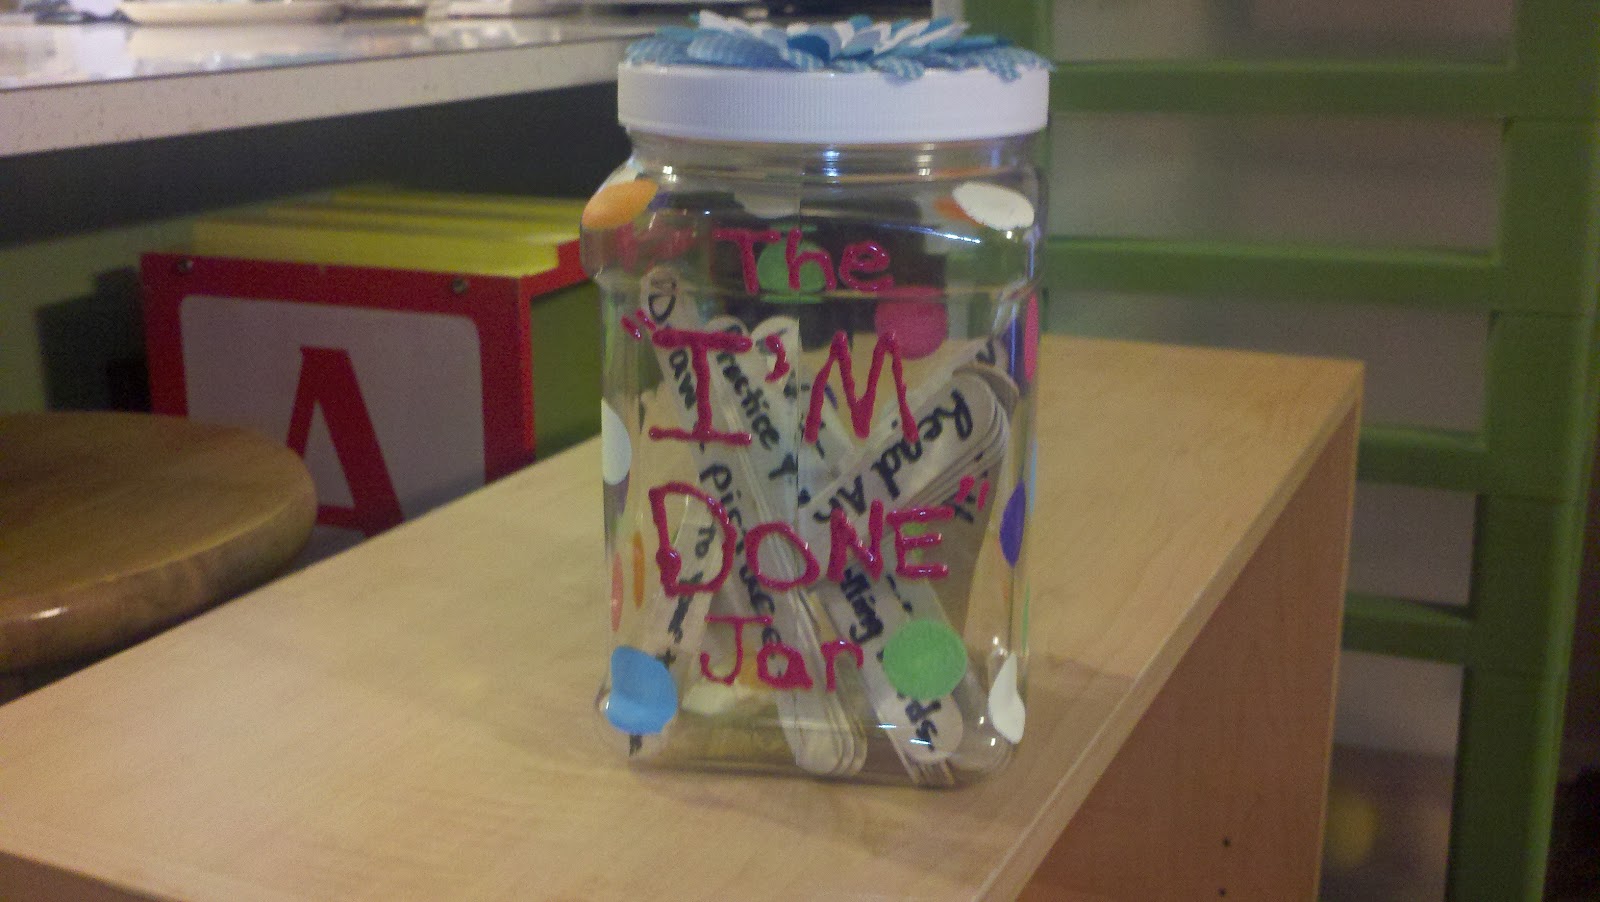
I'm Done Jar

In my searching and searching and searching (we'll call it research) on Pinterest (yes, I'm always on there, and that's where all most of my good ideas come from), I found something called the "I'm Done" jar.  Well, I thought it was a great idea, so I made my own version!

I am working on my crafting (and think I'm getting pretty good at it), but I am certainly not the best out there!  But I love it and think it is so cute!  I found the jar at Walmart in the kitchen section for $1.97.  It is plastic.  There are plenty of different containers you could use for yours.  I definitely didn't want glass in case it got knocked over.  I found a Planters Peanuts container is almost exactly like the jar I bought, and was going to see about using it for something like this.  However, they are not dishwasher safe.  We'll just leave it at that. lol

I painted polka dots on it since that will be part of my new theme, but you can obviously decorate it however you want to.  I added some coordinating flowers I found at Hobby Lobby to the lid because I didn't like it plain and boring!  Those flowers are also being used on a lampshade that I am redoing, so they will coordinate.  I'll post pictures of the lampshade and a bunch of other things I am working on when I finish with them.

Now, obviously (I say that word too much, don't I?), the jar is for when students are done with their work.  You will always have those students who finish work more quickly than others, so this jar is perfect for them!  Rather than them interrupting you with that ever irritating , um bothersome, question: "What do we do when we're finished??", they can go straight to the jar.  There are popsicle sticks inside with different activities they can do.  I am still going to add more to my jar, but these are some I have so far:
  • Read AR (Accelerated Reader books--this is BIG at my school!)
  • Draw a picture
  • Write a story
  • Write a note to your teacher
  • Make up 5 multiplication/division/addition/subtraction problems
  • Make up silly sentences with your Robust Vocabulary (from our Harcourt reading series)
  • Practice your spelling words
  • Practice cursive writing
  • Make a list of adjectives/nouns/verbs
  • Go on Compass Odyssey (a program we use online) Lang. Arts/Math/Science/LA Extentions
  • Go on Kid's College (another program we use online)
  • Free Choice
You will, of course, need to adapt what you put on the sticks to what works for your class/school.  If you have any other ideas of what can be put in the jar, leave a suggestion in the comments!  Put what grades you think it would work for, also. Thanks!

Monday, June 11, 2012

2012-2013 Classroom Theme

I am so excited!  I just found what I want to use for my theme next year!  I already knew I wanted to do polka dots (can you tell I love them?), but I also need to somehow work our school theme, "Hollywood" into that.  I've been searching for a couple of weeks, and I finally found it!  I'm not telling ahead of time what it is going to be because I don't want anyone to steal my ideas ;).  I will post tons of pictures when I've got it all done though, and I won't care if anyone "borrows" my ideas then! (weird, I know.)  

I WILL, however, share some of the fabrics that I found the other day that I am going to be using.  They are so cute--I love them!


The first two are going to be curtains for my 4 BIG windows.  The dots will be the main part of the curtain and the stripes will be a trim at the bottom. 

 This one will be an accent fabric across the room from the windows.  I'll use it on open shelving to close them off and hide any mess I don't want showing!  


Since I am moving into a new room, I am going to start off right by having it 1) ADORABLE and FUN, and 2) NEAT and CLUTTER-FREE!  I am a very organized person (a.k.a. "neat freak"/"perfectionist"), and I am having a blast finding ways to make everything organized AND cute (mostly via Pinterest!) this summer.  I can't wait to get in my room and get started!

Thursday, June 7, 2012

Today's craftiness!

I was in a major mood to craft today.  Here are the three projects I got done tonight (after sitting through an 8:30-3:00 training!).  I love them all!  They are so adorable and go along with my new theme--Polka Dots! 


My theme while teaching 1st grade was ladybugs and frogs.  I bought this ceiling tile at a training a few years ago.  It was originally baseballs and I asked the lady to change them to ladybugs.  I then added the letters for my name and the wooded ladybugs in the corners.  To go with my new Polka Dots theme, I simply painted it white (after taking off the ladybugs and letters), and then added dots I found at Hobby Lobby.  They came in packs of 16 for $2.99 (they were labeled "Candy Labels" and were in the birthday party section).  The letters were also from Hobby Lobby (LOVE that store! I can spend HOURS in there!) and were in a pack with two different styles of font for $6.99.  I had the little flowers left over from another craft project (can't remember where I got them) so I added them in because they were cute and the colors worked.


I saw something similar on Pinterest and got this idea (I'll try to find the source and link back to it to give credit--I'm new to all this, so work with me here!).  It's a flat canvas panel that I painted purple and then added dots and ribbon border with dots.  I am going to paint some clothes pins for the students to use when they need to go to the bathroom.  Blue ones for boys, pink ones for girls.  They will have my name on them and a number (based on the number of stalls in the bathroom) in case they get dropped or lost, so they can be returned to me.

Update (7/4/12): Here is a picture of the Bathroom Passes with the clothespins attached.  I made extra pins for any that get lost or misplaced (or nasty--it is the bathroom, after all).  I won't put all the pins on there to start with.  I'll just put the same number of pins on the board as there are stalls in each bathroom.  The pink are for girls and the blue for boys.  They have my name on them, front and back.  And polka dots, of course! :)


I think this one is my favorite.  And it definitely took the longest to make!  I bought the cart at our local Christian Mission for $10 and I looked up (again, on Pinterest--I'll check for the source later) ways I could decorate it.  I ended up finding two adorable wrapping paper rolls at Hobby Lobby and used Mod Podge to glue them down.  It took a lot of eyeballing, measuring, cutting, gluing, re-cutting, patching, etc., but I LOVED how it turned out!  So so cute!!!  I've got another cart similar to this one at school that I am going to bring home and do the same thing to.

It's late, I am tired, but I am so happy with how they all turned out!  Believe it or not, I am not all that crafty or creative, so when something turns out, I am ecstatic about it!  But now it's time to turn in.  I have another 8:30-3:00 training tomorrow! 

Wednesday, May 30, 2012

Welcome

Welcome to my new blog!  I am just getting started, so there will be lots more to come!  I am glad you stopped by!